Setting up Dreamweaver for CedarNet
Dreamweaver has a very good online help you can access
at anytime by clicking the "HELP" button at the top right in
either the SITE window or the editing window. It has an internal
search engine and explanations that are fairly easily understood.
There are more ways than one to do most everything in this software,
so I suggest you utilize the help to find your way around the
editing tools. I will attempt to help you fill in information
that is pertinent to CedarNet. If you have any questions, please
feel free to contact webmaster@cedarnet.org.
FTP (File Transfer Protocol) set up:
When you open up Dreamweaver, it will automatically bring up
a blank page for creating new HTML documents.
~ Open up the Site Definition window by selecting "Site" from
the menu at the top, and then "New Site"
Highlight "Local Info" on the left and fill in the fields
as follows:
- Site Name = Cedar Net (or you can choose anything
you like here)
- Local Root Folder = where you want the info stored
on your computer I use the default which places it within
the Dreamweaver files on my hard drive
- HTTP Address = http://www.cedarnet.org
- I would suggest checking the cache option as it will
speed up link updates, but it does take up extra space
on your hard drive.
| 
|
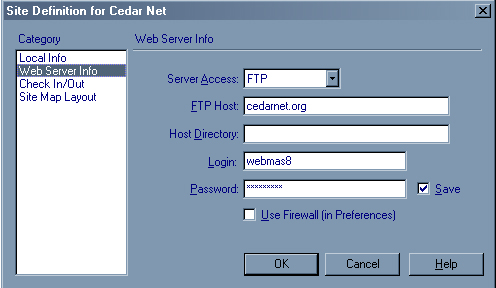
Highlight "WEB SERVER INFO" on the left and fill in the
fields as follows:
- Select FTP from the pull-down menu
- FTP HOST = cedarnet.org
- HOST DIRECTORY = the name of the folder where your
page is stored on our server (for CedarNet webmasters,
leave this blank)
- LOGIN = your User ID
- PASSWORD = your FTP password
- Check the box for saving your password unless you
prefer to supply it each time you work on these pages.
| 
|
| "Check in/Check out" allows you to work
on a file without anyone else changing it at the same
time and displays your name as having the file checked
out to other webmasters using Dreamweaver. This is optional.
|
| The "Site Map" option changes the way
the remote server info is displayed in your SITE window.
I have left this all blank, as I prefer simple file lists.
|
Click "OK".
When the pop-up asks if you wish to create a cache,
do not do so at this time unless you wish to store copies
of all of the CedarNet files on your computer (takes up
waaay too much space). You are now set up to FTP files
from your computer to CedarNet's server where they will
be displayed online. |
Selecting file to edit:
When you wish to edit an existing file from CedarNet, bring up
the SITE window. [below] Once you have your FTP all set up, you will be
able to connect directly to CedarNet files and upload files onto your machine
for updates, and then upload the changed file to replace the original on
our server.

- Click the "CONNECT" button. This will connect you via Internet
to the CedarNet server (remote host), and create a list on
the left of all the folders and files therein.
- Highlight the folder or file name that you wish to edit
- Click the "CHECK OUT" button. This will make a copy of that
file in your root folder (defined earlier), and add it to
the list on the right. It should also ask if you wish to include
all dependant files.
- YES will make it seek out any graphic (or other) files
that are needed to display the HTML file in question,
so choose this if you need to see all of the graphics
and such to edit the page.
- NO will leave those behind, but be much faster, so choose
this if the edit you are doing only involves text, or
if you have previously cached these files.
- Highlight the folder you want on the LOCAL (right) list,
then right click and select "OPEN" Make whatever changes you
need.
- Select "PREVIEW IN BROWSER" from the FILE menu and check
to make sure your work will be displayed the way you want
in both Netscape and in MSIE (Microsoft Internet Explorer)
- SAVE your changes
- Bring up the SITE window
- Highlight the file you have just edited on the LOCAL (right)
list
- Click the "PUT" button. This will FTP your file to CedarNet
and rewrite the file on the CedarNet server to match the one
you just saved.
- Click the "CHECK IN" button. This unlocks the file on the
CedarNet server so that other webmasters can now access it
as needed.
Created by Julie LeRoy on
... January 30, 2001
Note: In
your efforts, be sure to use your account in place of the
examples sited in this document.
Successful mastering of the process described in this document
may qualify you as a CedarNet Webmaster and a candidate
for CedarNet HTML Committee should you choose to volunteer
your time and talents as a CedarNet Webmaster. |
CedarNet is looking
for your organization's webpage to be hosted
or linked with us.
Last
updated
06-Jun-2003
|